Cameras, Mounts, and Cables

So, you want to be a YouTube star? Have you thought that through all the way? Maybe you’re like me, no desire for YouTube fame, you just want to watch your flights and do it without breaking the bank. Recording your flights does not have to be an expensive endeavor….

Written by
Richard Brown
Published on
24 Sep 2022
Tags

So, you want to be a YouTube star? Have you thought that through all the way? Maybe you’re like me, no desire for YouTube fame, you just want to watch your flights and do it without breaking the bank.

Recording your flights does not have to be an expensive endeavor. You can spend hundreds on each camera if you want to buy GoPros, Sony Action Cams, Garmin Virb, or the like, but there are other options. Years ago, before I ever thought I would realize my dream to fly I bought a GoPro Hero 3+. At the time it was a lot of money, now you can get them for about $100. They are a good camera and I still used it inside the plane facing backwards to capture the cabin and audio for a long time. I have since changed to a Drift Ghost X.

The GoPro Hero 3+ and the Ghost X are both compatible with the Nflightcam cable. With the GoPro you can charge and record at the same time, but on my plane I pick up a slight buzz when it is charging which prompted the switch to the Ghost X. It has 5+ hour battery life so I only plug in the audio (no charging) and have crystal clear audio. The cable is referenced later in this article. Here is a short review of the different cameras I have used, as well as the mounts I use and what you need to capture the audio from the radios.

The two biggest problems with action cams are short battery life and the price tag. If the camera is inside the plane you can overcome the battery life issue by plugging it in to a USB outlet to keep it charged. Take manufacturer claims of battery life with a grain of salt, also keep in mind that turning off the WiFi on the camera will help extend the battery life. If you have a camera that records 4K or 2.7K they will use more battery than recording at 1080p. The lower resolution it is recording the longer your battery life (and smaller file sizes). If just producing videos for YouTube to watch on a computer or phone 1080p works well. Even watching them on my 70″ TV through YouTube the 0180p resolution looks good.

I have not used the Garmin Virb, Sony Action Cam, or any GoPro besides the Hero 3+. These data points are from internet searches. The Garmin Virb boasts a battery life of 3 hours and it will run you around $300-700 depending on the model. The Sony Action Cam boasts a battery life of just under 2 hours and will run you around $200-500 depending on the model. GoPro has a number of different models, all of which claim to be around 90 minutes of power and you will spend around $300-500 per camera.

If you want just one camera, maybe $200-300 isn’t too much to spend. However, if you want one (or two) facing you, another looking forward from behind you to see the panel/controls, another one (or two) outside capturing different angles, and maybe one (or two) inside the plane pointing out you are now talking about 4-7 cameras and the price has jumped up into the AMU range. (I assume everyone reading this knows what an AMU is, but in the event some of you are new to the game it is an Aviation Monetary Unit where 1 AMU = $1,000).

You may have seen the GoPro knock-offs and wondered if they were any good and worth your money. I have tried a few. The recording quality is good and while the battery life on some are marginal, I did stumble on one that was excellent. The following are all cameras that I own and have used.

Cameras

  • GoPro Hero 3+ – As I said earlier it is a good camera. The video quality is good but the battery life is marginal. As an inside camera it does well when plugged in and charging as well as capturing audio. The only downfall is that on my plane when it is charging I pick up a slight buzz in the background. You may or may not have that issue depending on the wiring in your plane.
  • Apeman Cameras and Dragon Touch 4K – These are GoPro knock-offs and the video quality is very good. There are a number of other GoPro knock-offs which I surmise have similar battery life and video quality. They cost around $90 off Amazon but sometimes you will get a deal and see them down in the $50 range. Unlike the older GoPros they have a screen on the back and the camera comes with two batteries as well as a case, a remote to turn it off and on, and some accessories. If you have multiples then the remote will start and stop all of them at the same time. However, if you have the camera outside you can control it with the remote prior to engine start, but once you start the plane’s engine there is too much interference and you will no longer be able to connect to it. The battery life is between 45-60 minutes.
  • Drift Ghost X – I stumbled on this camera searching for better battery life. They boast 5 hours and while I have not tested it to that length, I do get more than four hours when the WiFi is off. That makes it an excellent outside the plane camera because I can just start it recording, climb in the plane, and know it is going to still be running when I land even after a four hour leg. They also have an extended battery for $30 that will give you more than 5 hours which can be purchased here. The extended battery boasts 8 hours, which I have not tested, but I have had it running on two legs plus a fuel stop which clocked in at over 7 hours and it was still recording. The list price on Amazon for the camera is $99 but from time to time they have discounts bringing it down to about $80. Another excellent feature of this camera is the rotating lens. You do not have to try and come up with an assortment of mounts to angle it just right and get the picture level. Just mount the camera and turn the lens until the white arrow is at the top. There is no screen on the camera but you can easily connect it to your phone. When I set the camera up, I turn on the WiFi, connect to my phone, and make sure it is pointed where I want. Then I turn off the WiFi (to extend battery life) and press the record button. Note that there is no image stabilization which isn’t much of an issue if mounting under the wing, but inside attached to the headliner or side window at certain power settings it is a little shaky.
  • Drift Ghost XL Pro – In an effort to find a camera with good battery life and image stabilization I ended up with one of these in my camera bag. The image stabilization isn’t perfect, but where the Ghost X on takeoff if mounted to a window inside pointed forward at the panel produced unusable video, the Ghost XL Pro with the stabilization turned on was almost rock solid. The camera boasts a 7 hour battery life but I have not tested that yet. Reviews have said that you can get up to the claimed 7 hours but not if you are using the 4K mode or image stabilization. Also be aware that it does not have a changeable battery. While you can have a spare battery charged up and swap out on the Ghost X, once the battery in the Ghost XL Pro is dead you have to plug the camera in to recharge. Running it at 2.7K it produces files twice the size of 1080p. The Ghost XL Pro comes in at $250 still keeping it below the Garmin Virb or a GoPro with much better battery life. Overall I have been very impressed with it and may add another couple to swap out with some of my Ghost X cameras in the future for the stabilization feature.

SD Cards

You will need an SD Card for each camera. I believe all of the action cameras use Micro SD Cards, I know that all of the cameras I have used take Micro SD Cards. They come in various sizes and speeds. Be sure to check for any limitations on the maximum size the camera will recognize. Recording in 1080p a 30 minute file from any of the above cameras is just under 4GB so a 64GB card will record approximately 8 hours of video. Recording 2.7K produces 15 minute videos that are 3.66GB, about twice the size of 1080p. Given how inexpensive memory cards are now I prefer to go with SanDisk, I have never had problems with their cards. The 64 GB Ultra Micro SD is fast enough to record video and is about $12 a card. The 64 GB Extreme Micro SD is a faster card and for about $14 is still a bargain. Keep in mind that if you are going to record in 2.7K or 4K it uses a lot of memory. The Drift Ghost cameras will take up to a 128GB Micro SD card which are $17-20 for the Ultra or Extreme. As mentioned earlier, if you are just watching the videos on a computer or uploading to YouTube you likely won’t notice the difference between 1080p and 4K.

Cables – Or How to Capture the Radios

If you want to have the audio from the radios on your video, you need a way to capture it. If you have an audio panel that will connect via Bluetooth to a phone or tablet, I think you can capture it that way, but I have not tried it. Nflightcam makes a number of different cables that will connect to either a camera or plug into a phone. It goes between your headset and the jack. I have been using it for 100+ hours of flight and there is no loss in the quality of transmission or reception of the radios to my headset. A note about plugging the Nflightcam cable into the aircraft power system. Nflightcam says that it will not work, however there is a way around it to make it work. If you plug it in and then try to start recording it does not work. If you start the GoPro recording and then plug the cable into the camera it will continue recording, will pick up the audio, and will charge the camera.

Mounts

Just like you can spend a lot of money on cameras, you can bury yourself in camera mounts. The mounts that use 3M double sided tape work well on a wing, vertical stabilizer, or other areas. If you are like me, I am nervous about how well they will stick and wonder if someone is going to walk out in their backyard to find that they are the proud new owners of the camera that used to be attached to my plane. That being said, I have had one on the vertical stabilizer and it has remained in place even when coming downhill and seeing 180-185 mph IAS on the ASI so my fears are probably unfounded.

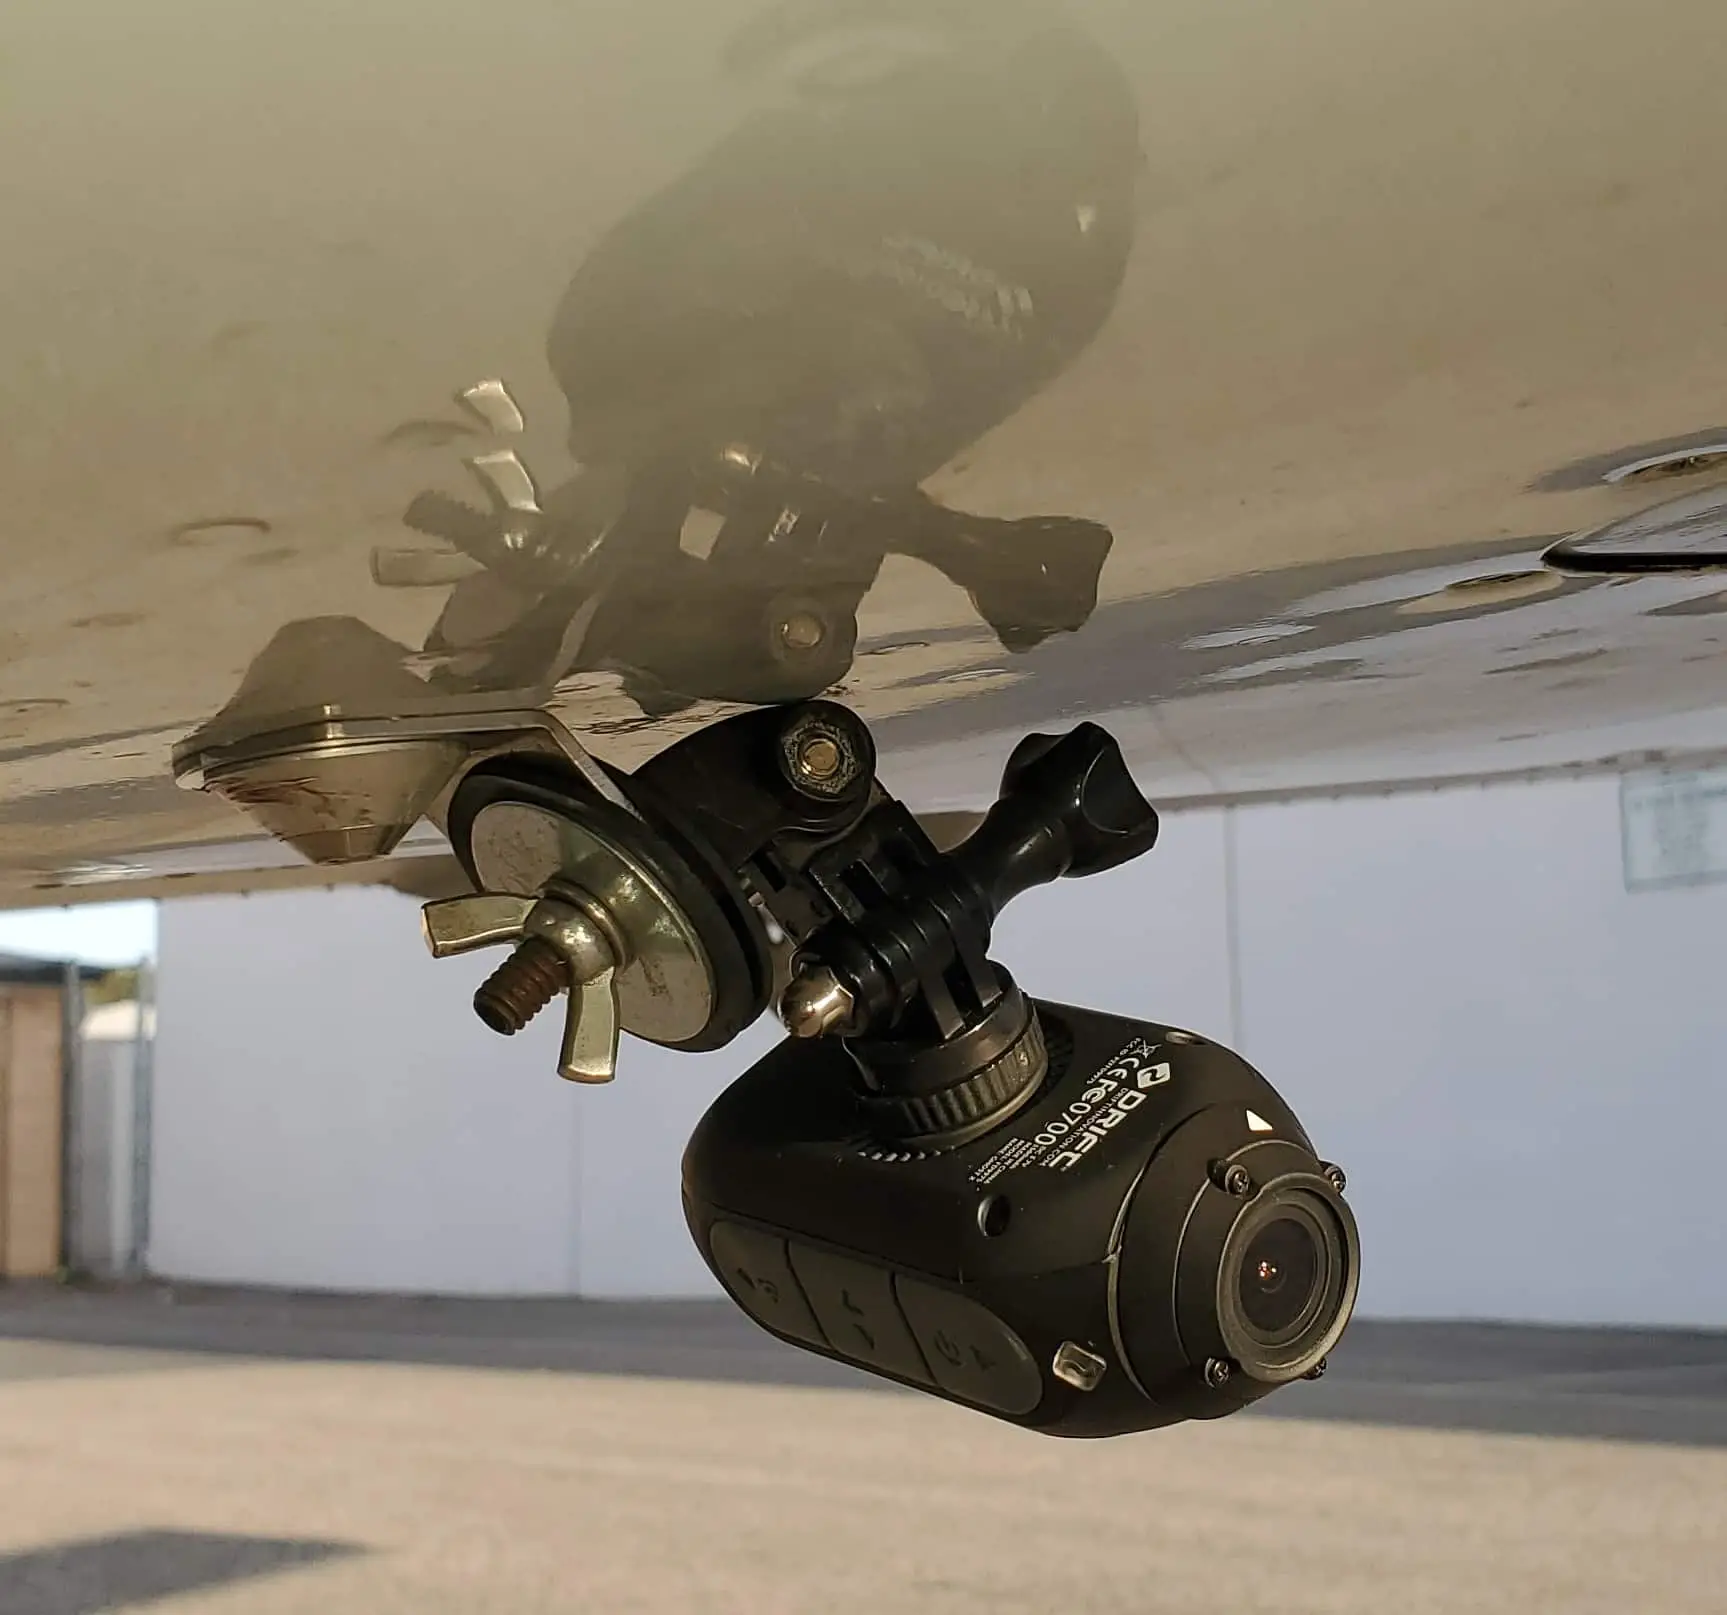
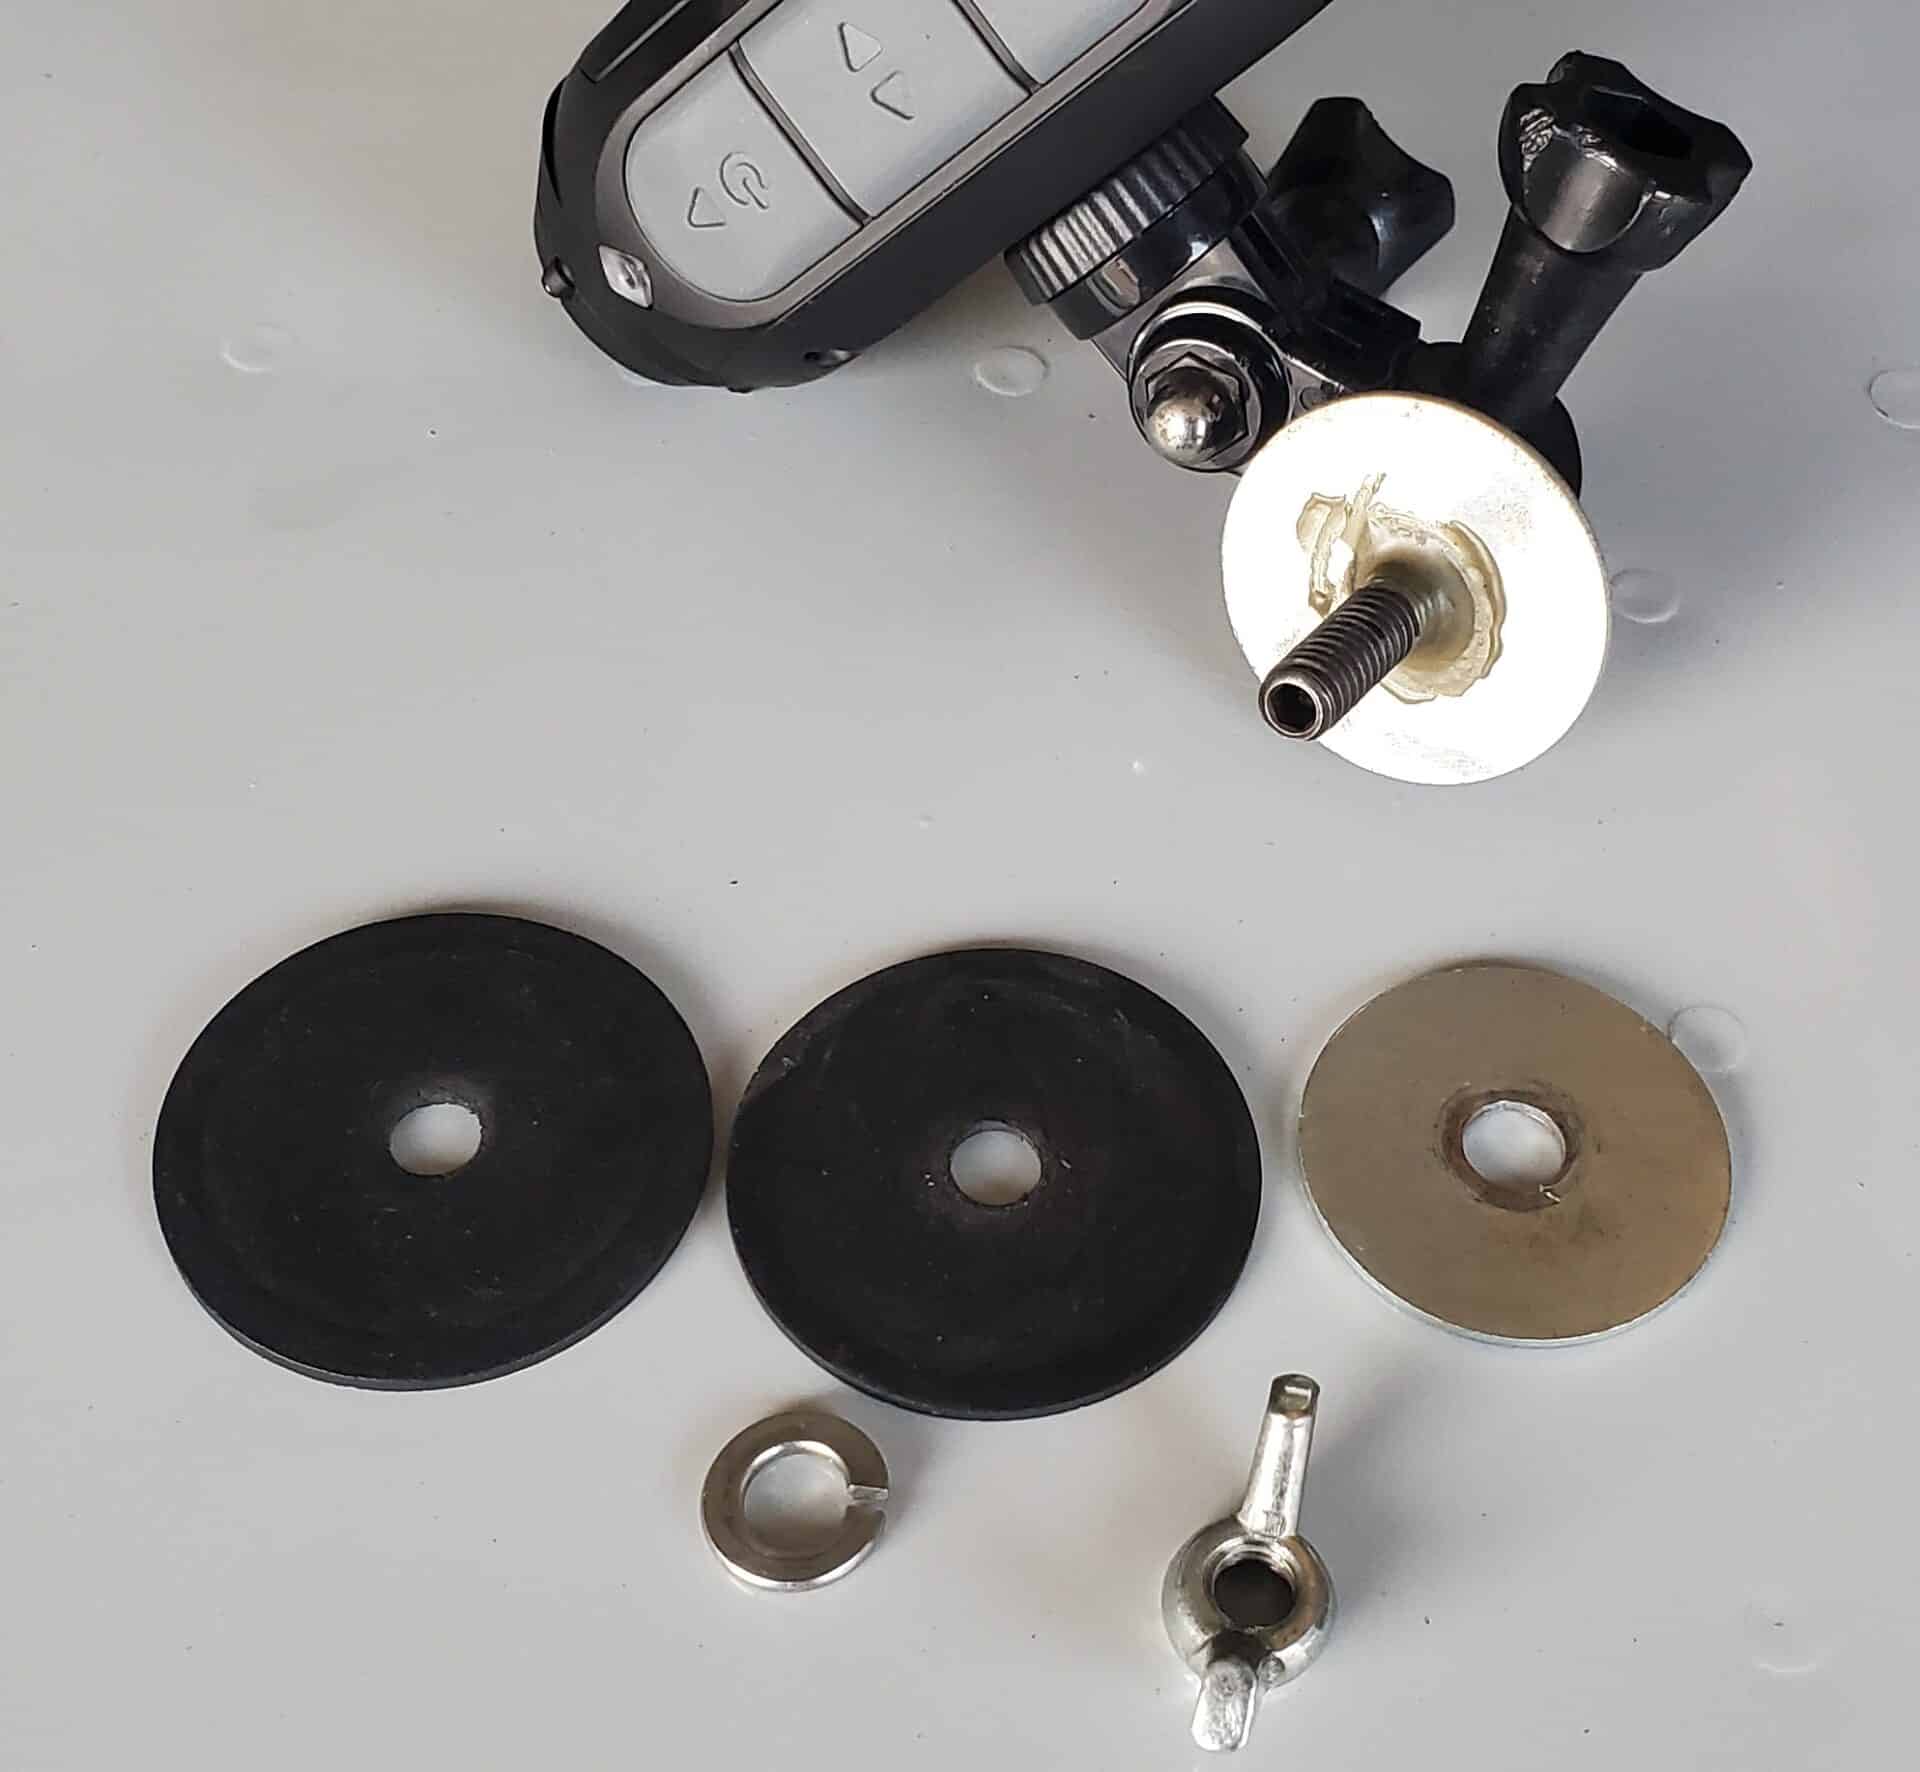
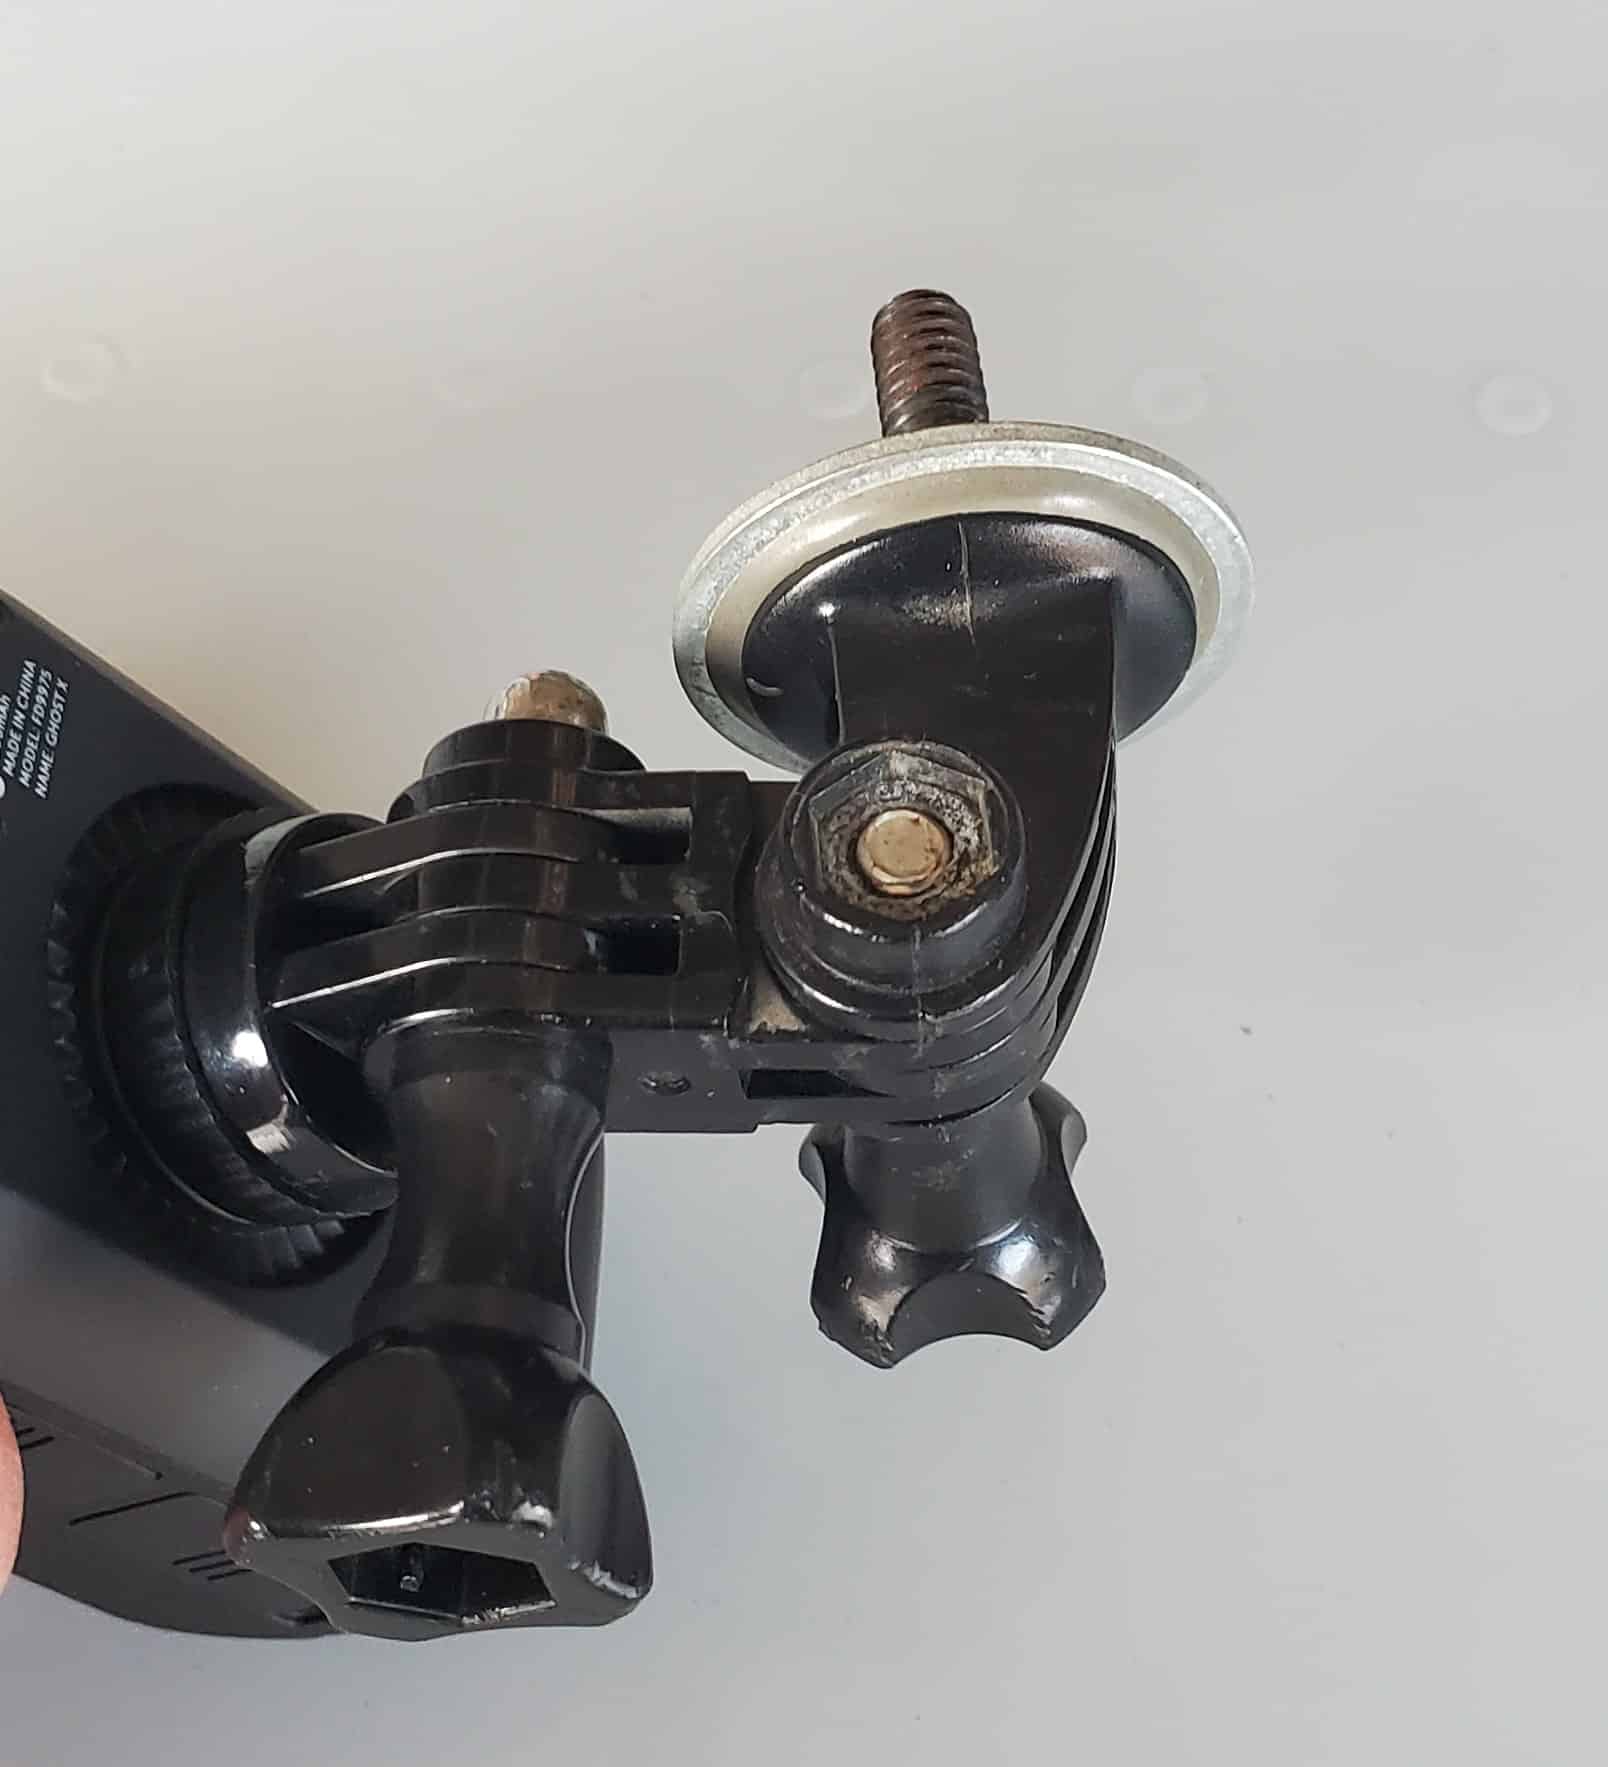
My favorite mount outside the plane is the one I made from some old GoPro mount pieces and parts from Home Depot. It is made up of a ¼-20 set screw, fender washers, neoprene washers (to act as a dampener and keep if from slipping), a lock washer, wing nut, and JB Weld.

Put some JB Weld on the set screw and screw it into the mount. Put a little more on one of the fender washers and attach it to the mount. It is not a requirement to attach the washer with JB Weld, but it keeps the washer from falling off the screw when you are attaching the mount to your tie-down or taking it off. Make sure you clean the exposed threads from any extra JB Weld, and it is also a good idea to run the wing nut all the way down and back up the threads while the JB Weld is wet. After that it is just a matter of which pieces you need to get the camera where you want it. Here are pictures of the mount and the camera attached to the tie-down.

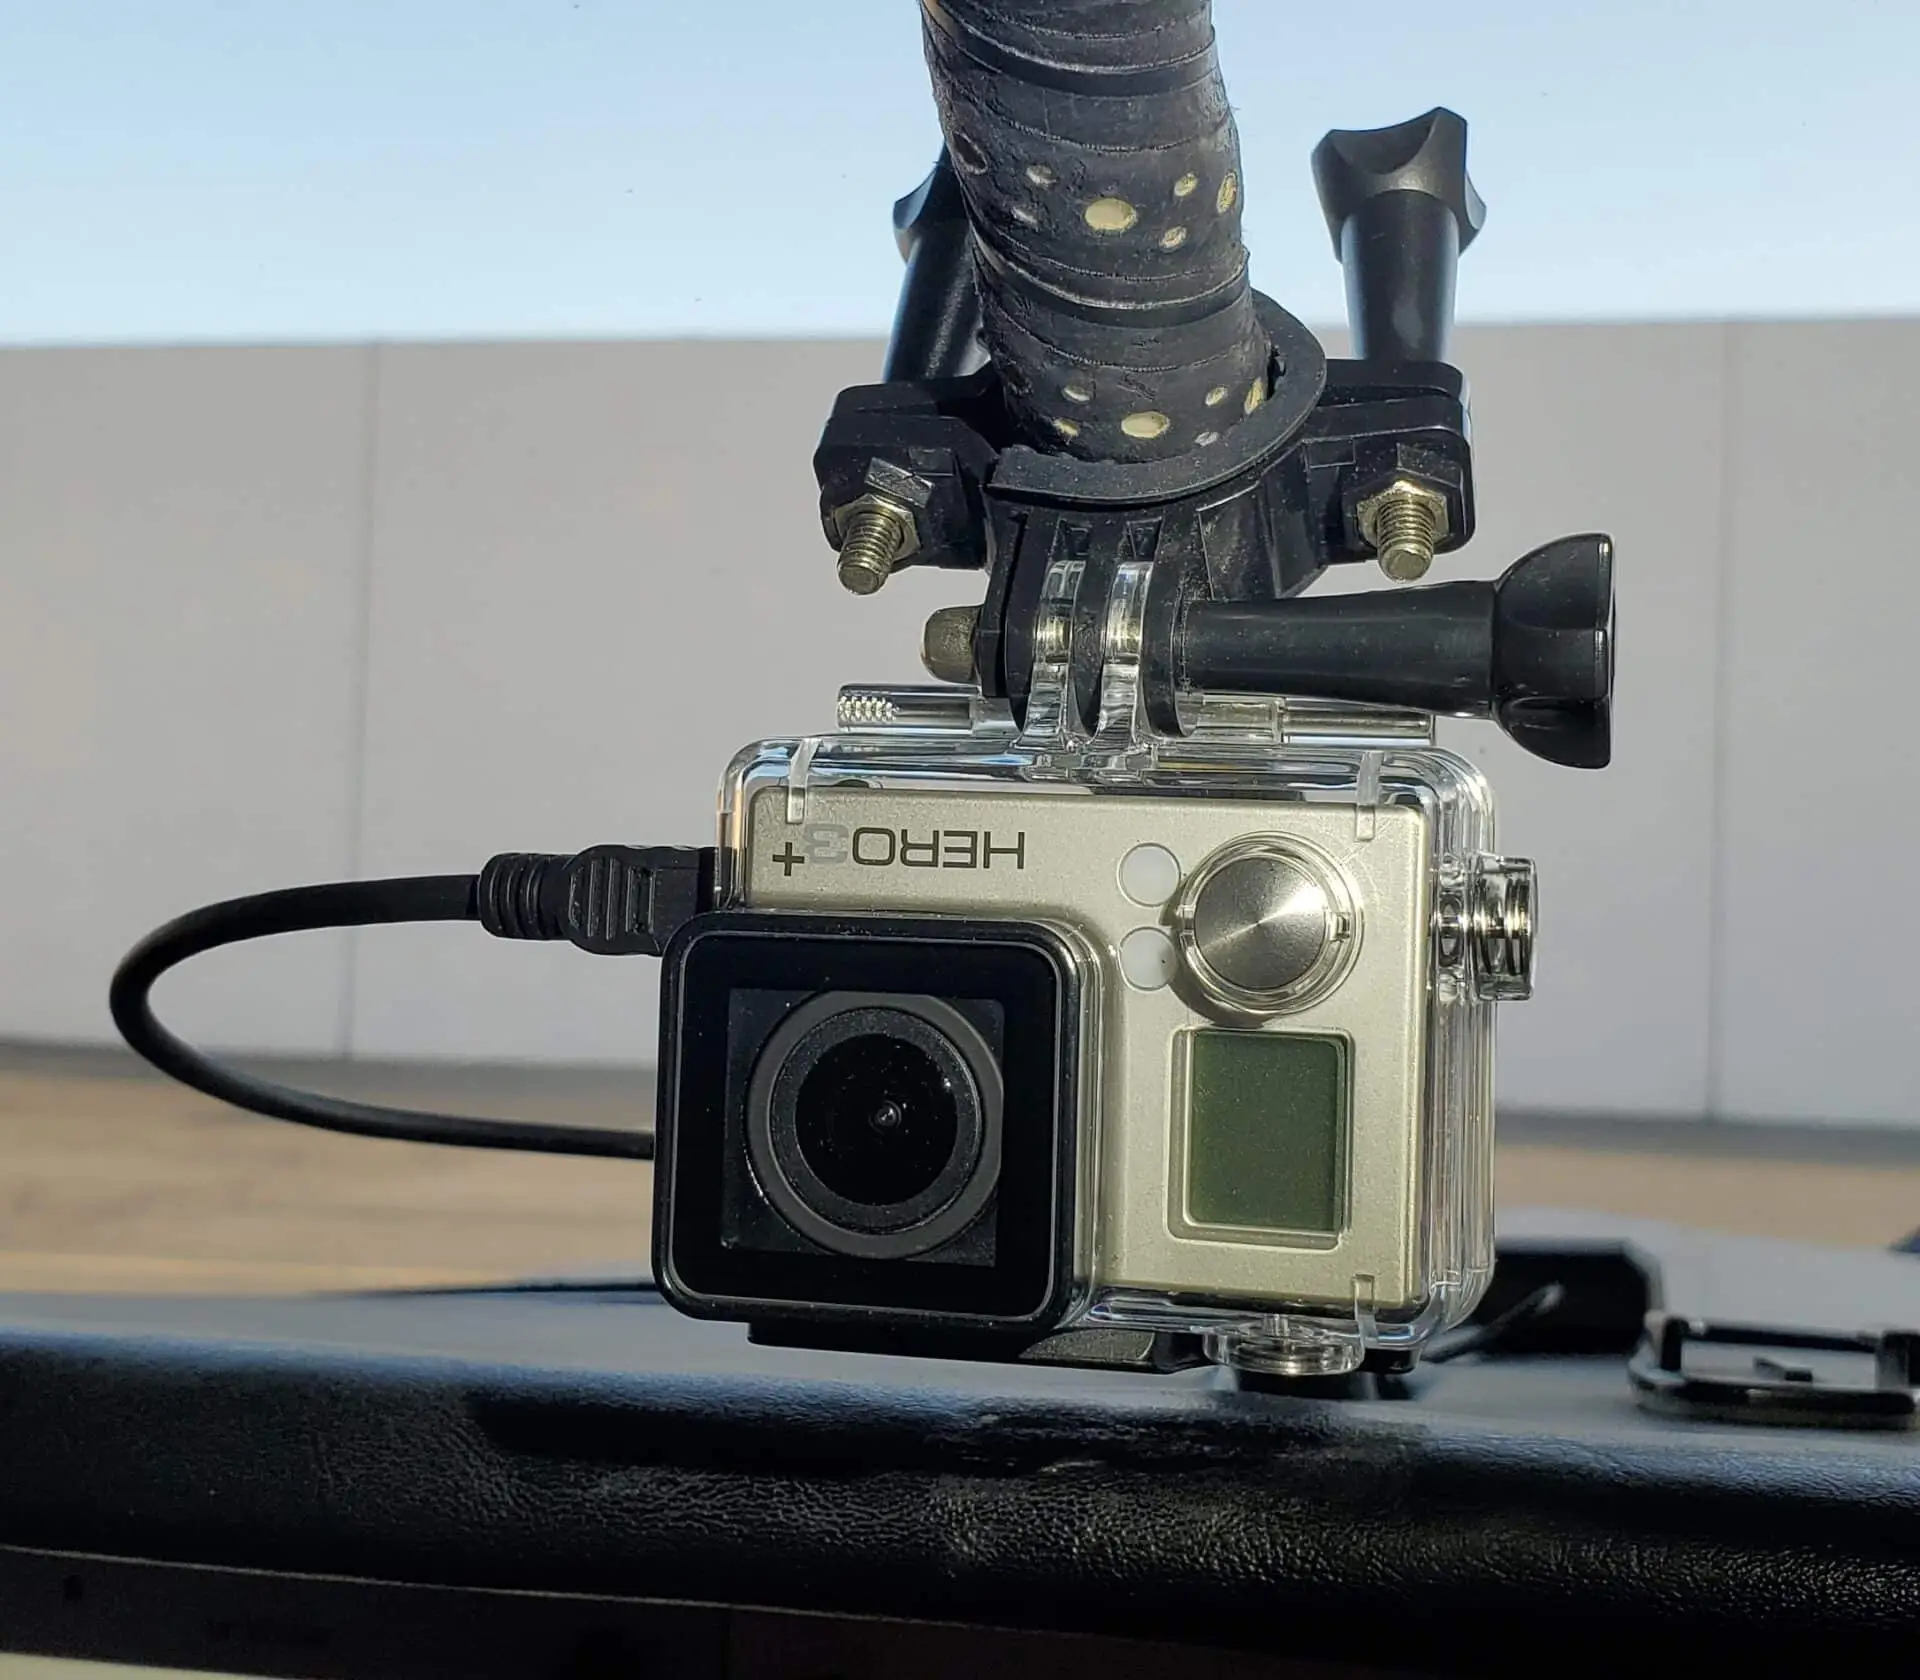
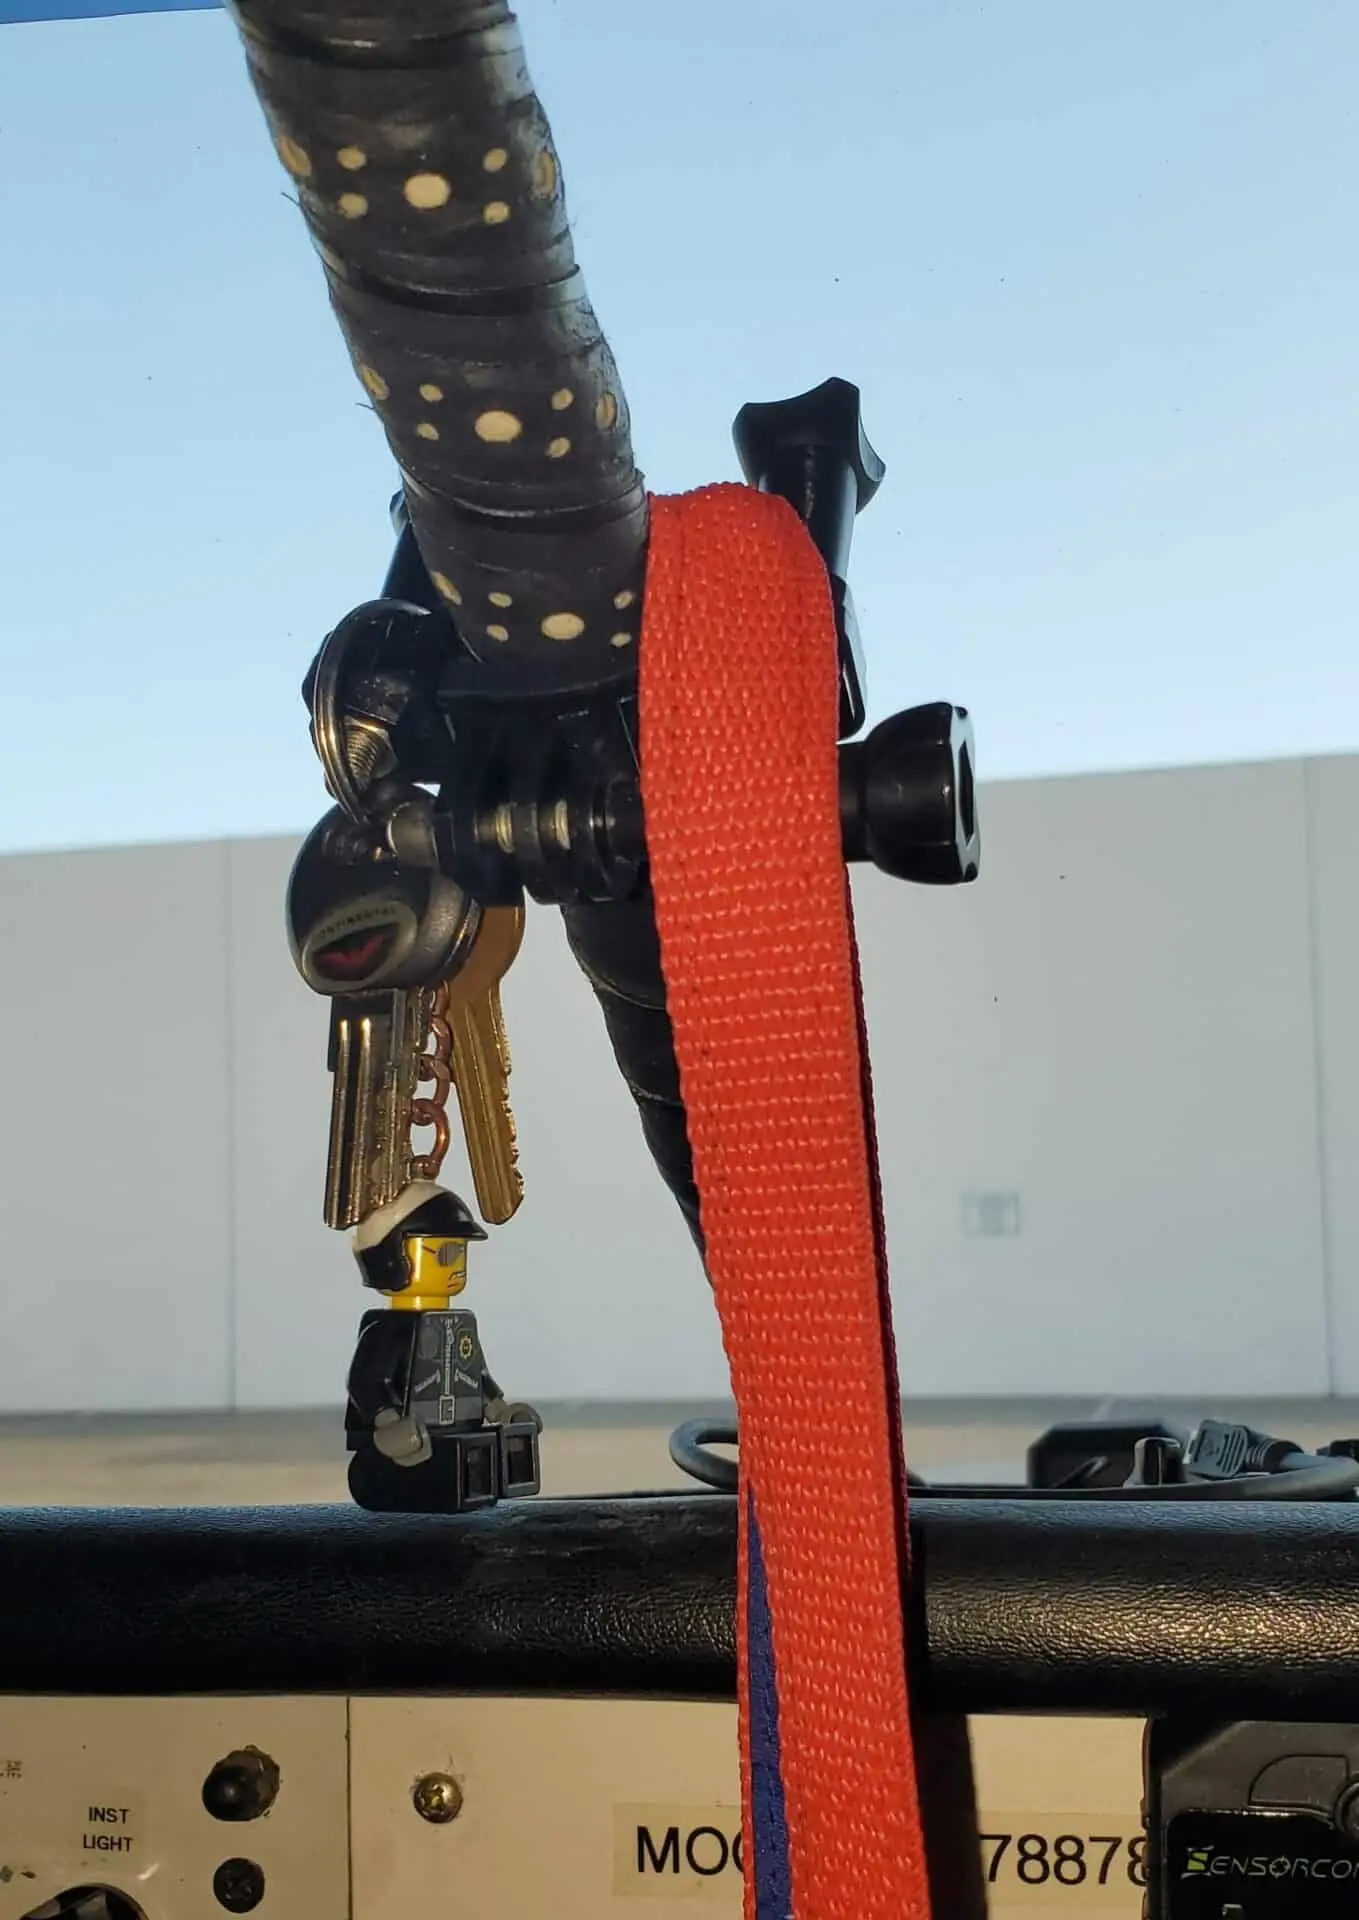
For the GoPro that is mounted facing me I use a handlebar mount attached to the center post which doubles as a holder for my keys and the lanyard with my PLB when parked in the hangar. 😊

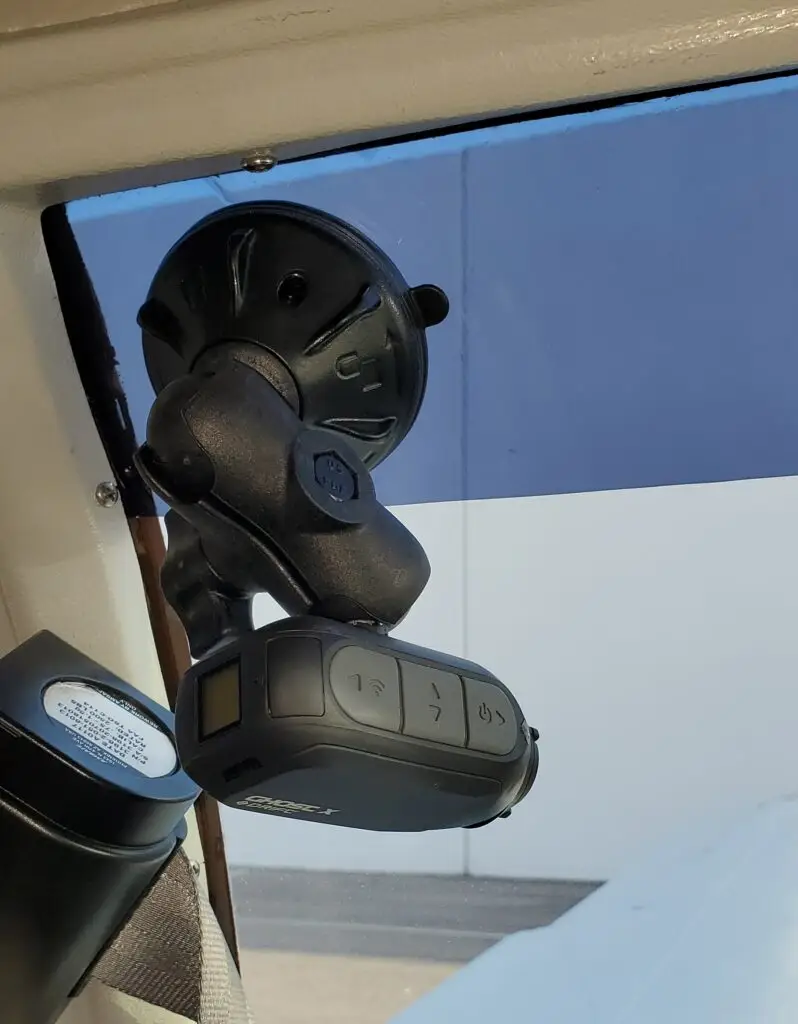
I like having cameras inside pointing out in front of the wings. They make for a great angle taking off, landing, turns in the pattern, as well as just switching between cameras throughout a flight. I use a RAM Suction Mount ($14.99), RAM Double Socket Arm ($14.49), and RAM Ball Adapter ¼-20 Post ($9.49). This setup has the least amount of pieces for less vibration. Some of the pieces are available on Amazon in addition to the RAM site.

Once you have your cameras all set up and recording you are going to want to edit and produce the footage. There are a number of both free and paid for programs. I used Shotcut for a long time. It is free, has a little bit of a learning curve, but there are lots of Youtube videos on how to do things in the program. It does not have a lot of bells and whistles but you can produce some decent videos with it. I recently started using Hitfilm Express which has both a free and paid for version. The free version offers just enough to produce good videos but leaves you wanting more as they try to entice you into purchasing the full version. The paid for version can do incredible things in editing, but there is a learning curve to it.

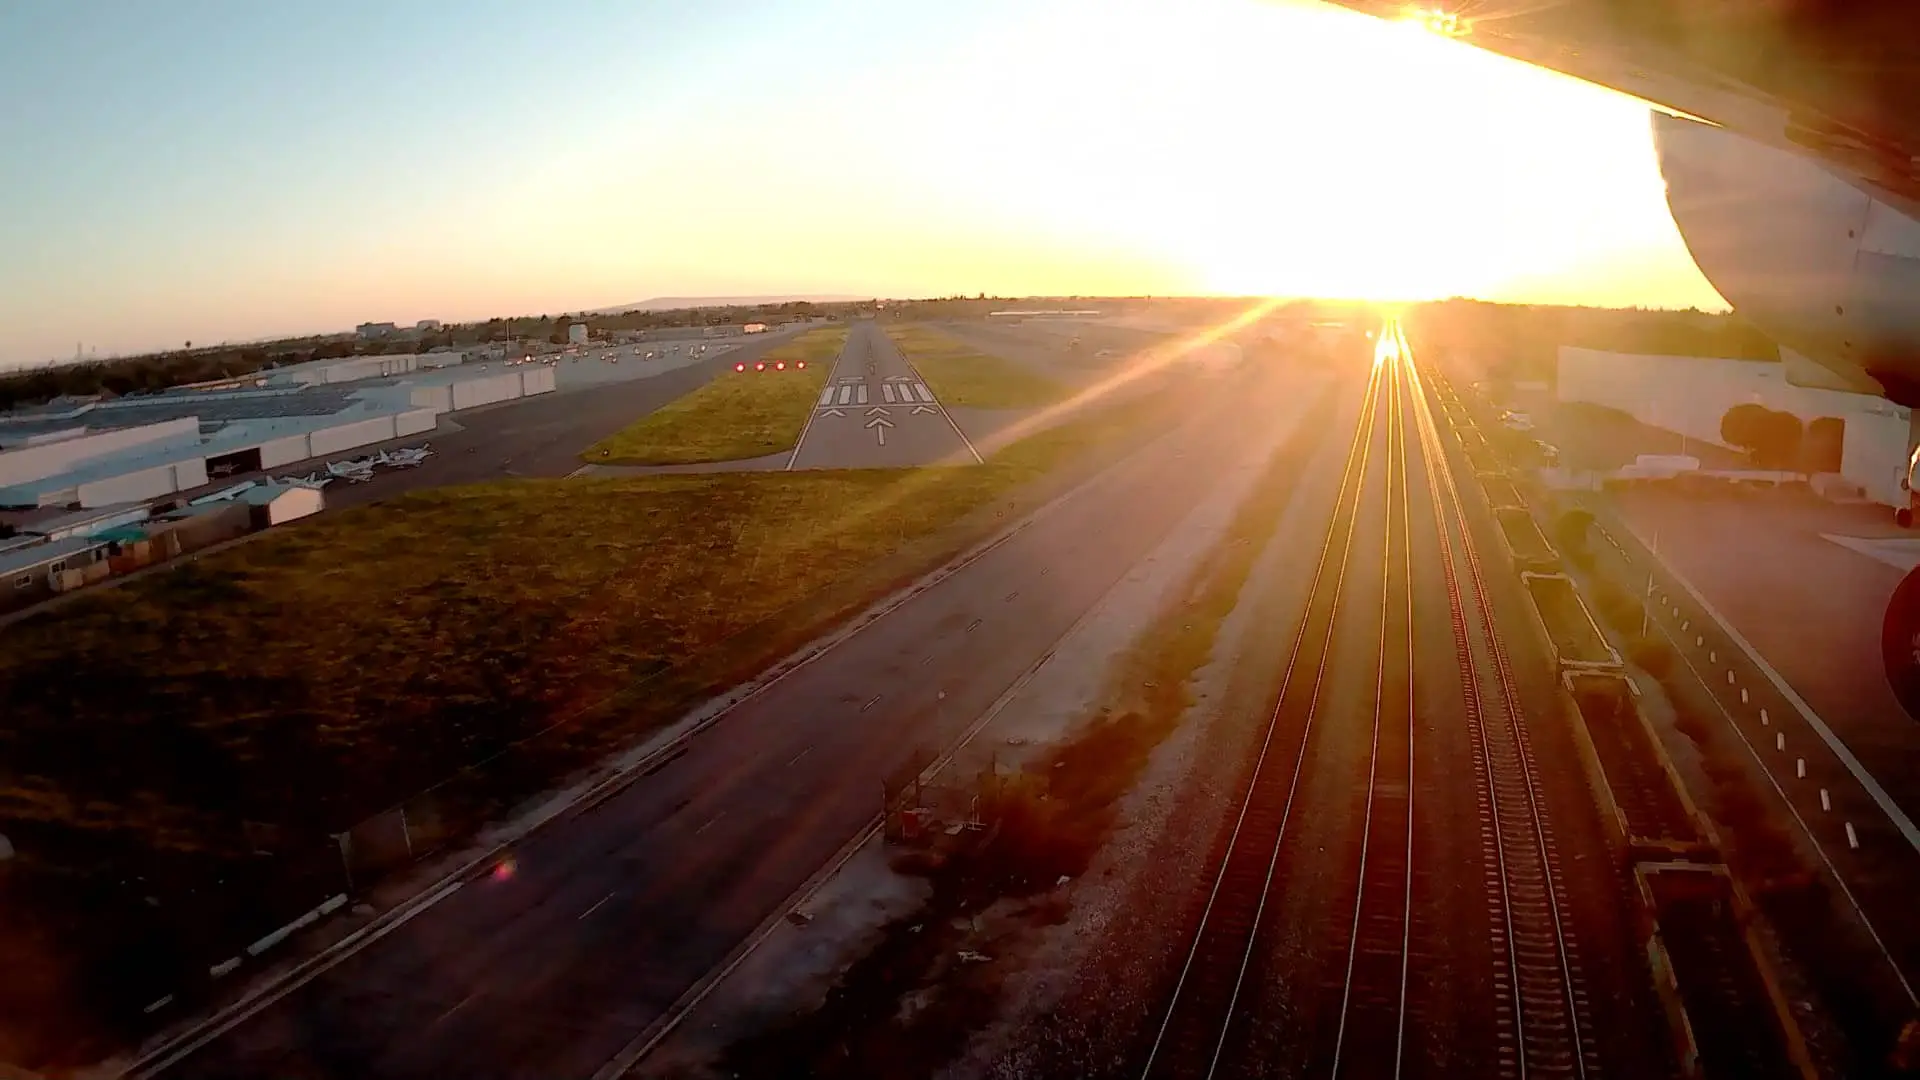
If you are like me, you will find that it takes longer than you want to edit and produce videos resulting in hours and hours of footage trapped on your computer. You may also find, like me, that it is great to be able to pull a picture from the footage and get a shot you would never have otherwise. One of my favorites is this one on short final to 24 at KFUL with the setting sun shining off the railroad tracks.

This video will show you what the different angles look like that are described above. It was before I found the Ghost cameras, so it also shows the video quality of the Dragon and Apeman cameras.

This video shows the quality of the Drift Ghost X. It is all at normal speed (and long) but just jump around it. If you want to see some of the best footage I think I have captured skip ahead to the 30 minute mark. The sun has set, there is a thin marine layer, and the lights from the numerous container ships anchored offshore are glowing up through the clouds.

Subscribe to newsletter

Stay informed and inspired! Sign up for my monthly newsletter to receive my latest posts, stories, and exclusive updates straight to your inbox. (I will never share or sell your information)

 And get free stickers!

Similar posts

More from Informational

Enjoyed the read? See more similar posts that you’ll also love.

What is Your Line in the Sand

We returned from a trip to Colorado on a Thursday with plans to fly to St. George, UT on Saturday morning. My youngest son had...

Richard Brown

1 Mar 2024

Subscribe to our newsletter

Stay informed and inspired! Sign up for my monthly newsletter to receive my latest posts, stories, and exclusive updates straight to your inbox. (I will never share or sell your information)

 And get free stickers!